SF Bay Brine Shrimp Hatchery
Free Shipping on orders over $50 (T's and C's Apply)
|
|
For Baby Fish & Reef Tanks
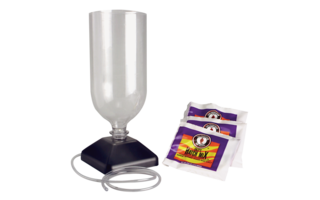
Hatch your own fish food or use as an educational tool. Includes base and 3 packets of Hatch Mix™. Add soda bottle, air pump and water. Not intended to raise shrimp to adult size.
Product Features
Easy to setup, clean & maintain
Can be used again and again
Inexpensive
Proven to trigger a feeding response in fish fry
Recommended For
Small or Baby Freshwater Fish: Egg Laying, Live Bearing, Platys, Tetras and others.
Small Saltwater Fish: Gobies, Blennies and others.
Saltwater Invertebrates: Tridacnid Clams, Crabs, Feather Dusters, Shrimps, Sea Apples and others.
Corals: SPS, LPS and others.
Information
1. Setting up the Hatchery
A) Take a 2 liter soda bottle and cut off the bottom of the bottle (right where it starts to curve inward).
B) Turn the bottle upside down and screw it into the Hatchery base.
C) Attach one end of the airline tubing to the bottom of the base and the other end to an air pump. To prevent pump damage during a power failure use a check valve (found at your local pet/fish store) or place pump above water surface level.
2. Hatching eggs
A) Fill the bottle with 1 liter (about 1/2 full) of dechlorinated water.
B) Plug in air pump to start aeration.
C) Add one packet of Hatch Mix™ (if you are mixing your own eggs and salt; use a teaspoon of eggs and 1 tablespoon of aquarium rock salt or synthetic sea salt).
D) Place a light source about 8 inches away from the bottom of the bottle.
E) Temperature should be about 80-82 degrees F; pH should be maintained above 8.0.
F) Eggs should hatch in 24-36 hours
3. Harvesting the baby brine shrimp
A) Unplug air pump (keep pump above water surface)
B) Wait approximately 5-10 minutes for babies to swim towards the light at the bottom of the bottle and for the shells to float to the top.
C) Remove airline tubing from pump (keeping above water surface).
D) Slowly lower tubing over a brine shrimp net to strain babies from water.
E) Rinse babies under cool tap water to remove salt.
F) Feed to your fish.
Clean up
A) Dump hatching water from bottle
B) Remove bottle from Hatchery
Clean bottle and Hatchery with hot tap water and rinse well (you can also use a commercial aquarium cleaner)
NEVER USE HATCHING WATER MORE THAN ONCE. ALWAYS USE A CLEAN BOTTLE.
|
© Copyright Creative Aquarium Solutions |


